Enabling and Configuring HTTP/3 and QUIC in NGINX
Reading time: 10 minutes
Preface
With the rise of HTTP/3 and QUIC (Quick UDP Internet Connections), web technology has taken a leap forward. HTTP/3 brings significant improvements in speed and efficiency by using UDP instead of TCP. The result? Lower latency and faster website load times. This is especially the case in high network latency situations.
In this blog post, I will guide you step-by-step on how to enable and configure HTTP/3 and QUIC in NGINX.
About HTTP/3 and QUIC
QUIC is a protocol originally developed by GOogle, and it forms the basis for HTTP/3 connections. It uses UDP insteead of TCP, therefore it is faster in network conditions with high latency.
HTTP/3 is the latest iteration of the HTTP-protocol and it builds on QUIC. It provides lower latency and improved performance in situations with packet loss or network instability by its use of UDP/QUIC.
HTTP/2 and HTTP/3 comparison
HTTP/2 and HTTP/3 are not only different in terms of features, but they are also built on entirely different architectures.
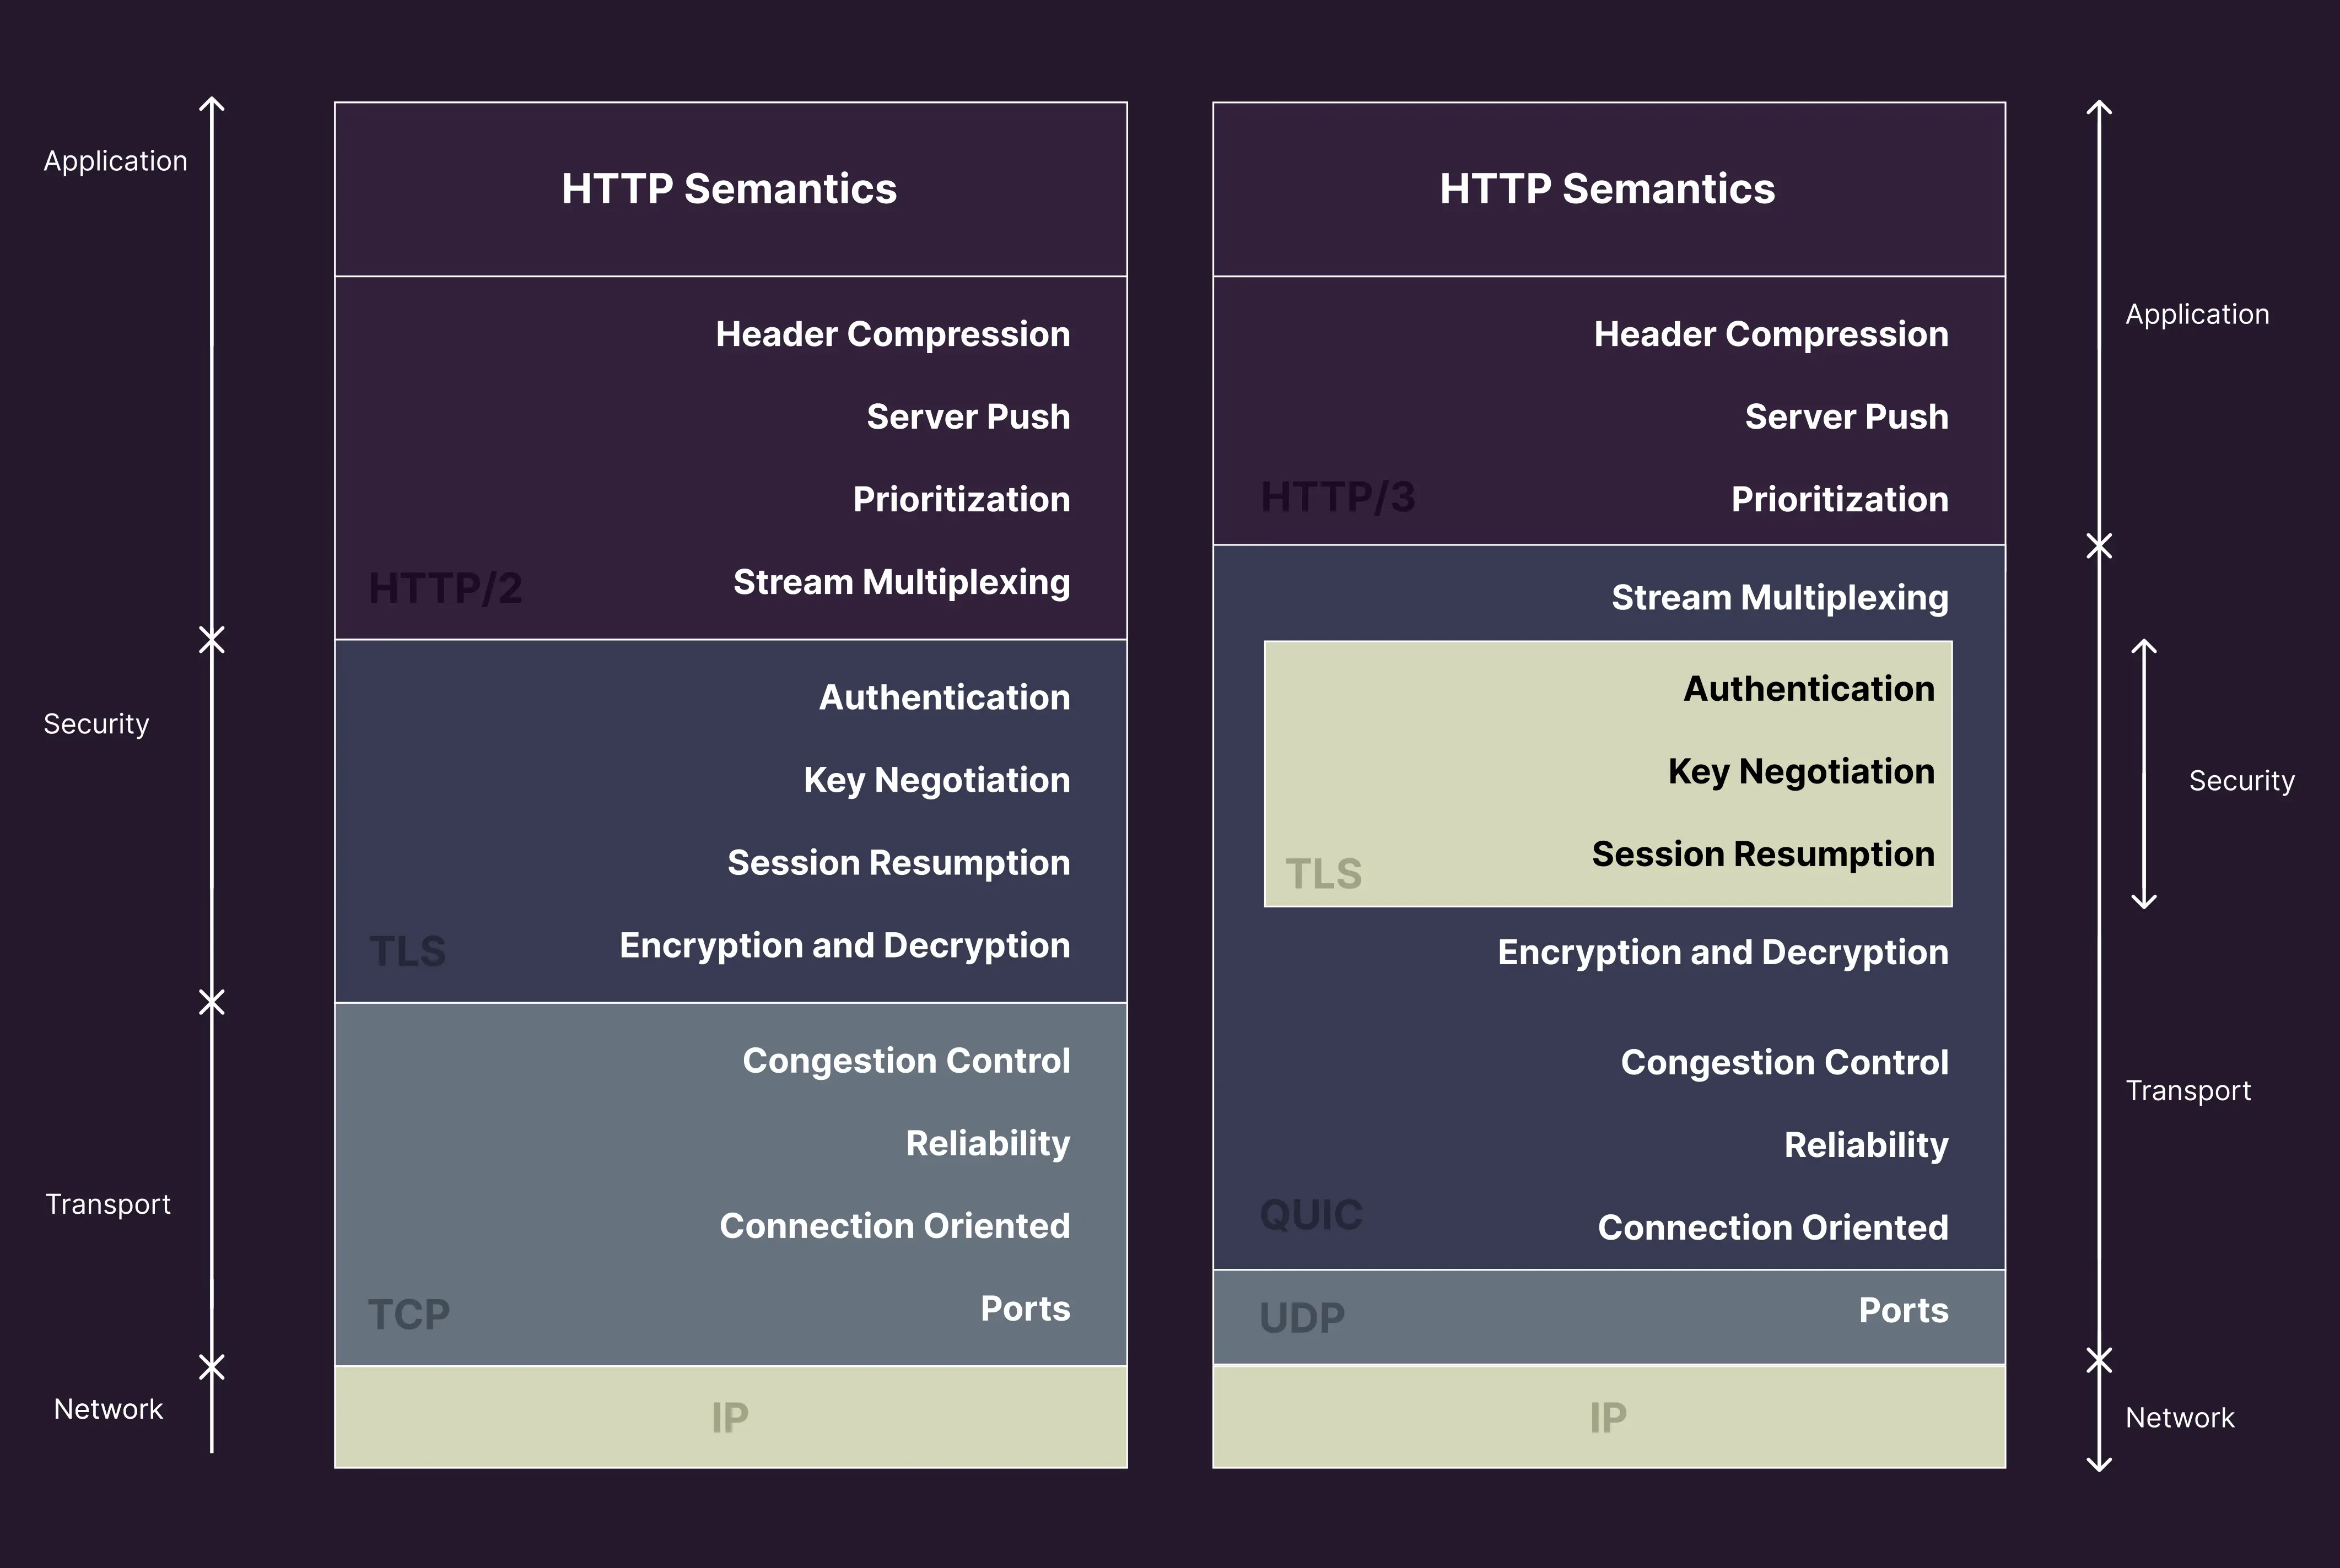
As you can see, the QUIC layer combines much of what was traditionally handled separately by the TLS and TCP layers in HTTP/2. By unifying these elements, QUIC eliminates extra round trips, resulting in faster connection setup and significantly improved performance. This integration also enables 0-RTT connection resumption, allowing data to be sent immediately when reconnecting to a server.
For example, in the days of HTTP/1.1 (yes, ooff..), every connection required the entire stack to be set up from scratch. HTTP/2 drastically improved this by allowing connections to be reused with session resumption. Building on that, HTTP/3 takes it a step further by embedding session resumption directly into the transport layer, delivering even faster setup times with 0-RTT. This approach not only reduces latency but also avoids unnecessary overhead by simplifying the transport stack.
0-RTT stands for 'Zero Round Trip Time' and allows a client to send data immediately when resuming a previous session, skipping the usual handshake delay.
Why enable HTTP/3 and QUIC?
Enabling HTTP/3 and QUIC has a couple of advantages, I'll list them below:
- Performance: HTTP/3 reduces the overhead of the traditional TCP connections by using multiplexing over QUIC (UDP).
- Load Times: HTTP/3 makes websites faster; particulary on busy networks with high latencies.
- Future-Proofing: Just like HTTP/2 ever was, browsers and networks are shifting towards HTTP/3 as a new standard. Enabling HTTP/3 and QUIC will make sure your web applications are ready for the future.
Installation and How-to
Before we begin, we need to ensure that we're using the correct version of NGINX. The HTTP/3 support has been natively added in 1.25. Therefore we need this, or a newer version. As of writing, 1.26 is the latest version you can install from the official NGINX repositories. In this guide we will install NGINX from the official repositories. If you want to compile NGINX yourself, you can find a guide HERE.
Installation
Setup the dependencies
apt install curl gnupg2 ca-certificates lsb-release ubuntu-keyringImport the GPG
curl https://nginx.org/keys/nginx_signing.key | gpg --dearmor     | sudo tee /usr/share/keyrings/nginx-archive-keyring.gpg >/dev/null \
gpg --dry-run --quiet --no-keyring --import --import-options import-show /usr/share/keyrings/nginx-archive-keyring.gpg
Add the repository
echo "deb [signed-by=/usr/share/keyrings/nginx-archive-keyring.gpg] \
http://nginx.org/packages/ubuntu `lsb_release -cs` nginx"     | sudo tee /etc/apt/sources.list.d/nginx.list
Update the repositories and install nginx
# Update the repositories
apt update

# Check if NGINX 1.26 (or higher) is available
apt info nginx
Package: nginx
Version: 1.26.2-1~noble

# Install nginx
apt install nginx

# Enable nginx
systemctl enable --now nginx
Setup HTTP/3 and QUIC
Once we've installed NGINX with QUIC, HTTP/3 and the right OpenSSL version support, we can setup the vhost. Setting up the VHost is quite easy, if you once have the hang of it. We just need to add a couple of little values and settings in order to enable HTTP/3 with QUIC.
Using NGINX from the official repository is a little bit different than the native one in Ubuntu. The biggest 'change' is that you don't have sites-enabled and sites-available directories by default. Instead we have to drop our vhost configurations in /etc/nginx/conf.d .
Please note that you'll need a valid SSL certificate for the VHost you want to use. For example, you can obtain a free certificate with certbot.
VHost Template
To get started, you can use the template below.
server {
        listen 443 ssl;

        # Enable quic for IPv4 and IPv6
        listen 443 quic reuseport;

        # Turn on http2 and http3/QUIC
        http2 on;
        http3 on;
        http3_hq on;
        quic_retry on;

        # Set servername
        server_name quic.larrs.nl;

        # Set SSL
        ssl_protocols TLSv1.3;
        ssl_certificate /etc/nginx/ssl/fullchain1.pem;
        ssl_certificate_key /etc/nginx/ssl/privkey1.pem;
        ssl_prefer_server_ciphers off;
        ssl_session_tickets off;

        # Advertise HTTP3 support, so browsers know they can use QUIC.
        add_header Alt-Svc 'h3-23=":$server_port"';

        # Location block
        location / {
                root /www/public;
                index index.html;
        }

        # Logging
        access_log      /var/log/nginx/quic.larrs.nl.log;
        error_log       /var/log/nginx/quic.larrs.nl.error.log;
}
Let's break this configuration down. This configuration includes some standard SSL settings as well, we'll only cover the HTTP/3 and QUIC settings for now.
Enable QUIC and reuseport
server {
        listen 443 ssl;

        # Enable quic for IPv4 and IPv6
        listen 443 quic reuseport;
In order to use SSL and QUIC, we have to define a port for SSL, but a port for QUIC as well. Since both are encrypted protocols, we have to use the reuseport option. Reuseport Makes sure that multiple worker processes can listen on the same port, without interfering with each other.
Set SSL settings
        # Set SSL
        ssl_protocols TLSv1.3;
        ssl_certificate /etc/nginx/ssl/fullchain1.pem;
        ssl_certificate_key /etc/nginx/ssl/privkey1.pem;
Make sure to set the minimum TLS version to TLSv1.3.
Advertise HTTP/3 and QUIC support
        # Advertise HTTP3 support, so browsers know they can use QUIC.
        add_header Alt-Svc 'h3-23=":$server_port"';
This header is very important, it advertises an alternative service the client can use. Let's break the header down
- Alt-Svc: This is the header used to indicate alternative services. In this case it is offering an alternative service for HTTP/3.
- 'h3-23=":$server_port"': This basically tells the connecting client: Hey, you can use HTTP/3, version 23, on port 443 as well, if you want? Given the VHost is listening on port 443, and not on any other artificial port.
Fallback for HTTP/2 support
Because HTTP/3 is still considered 'new', it is important to offer a fallback to HTTP/2. This ensures that the connection won't be dropped to HTTP/1.1 (Ew) for performance reasons.
        # Turn on http2 and http3/QUIC
        http2 on;
        http3 on;

        # You can set this to off if you want. This is for compatibility purposes. The HQ is a 'older' version of http/3. ('draft')
        http3_hq on;

        # Without the retry packet, NGINX directly proceeds with the connection setup. The retry packet is way to validate that a client 'owns' the provided IP address. This is done by a token that the client needs to send back.
        quic_retry on;
Save and Reload
After setting up the VHost, you can perform a NGINX configuration test and additionally reload NGINX to make the changes active.
nginx -t
systemctl reload nginx
In conclusion
Enabling HTTP/3 and QUIC in NGINX is a great way to future-proof your web applications while improving performance, especially in high-latency network environments. By leveraging QUIC’s UDP-based transport, HTTP/3 reduces connection setup times, minimizes latency, and provides a smoother experience for users.
With the right NGINX version and a few configuration tweaks, you can seamlessly integrate HTTP/3 into your setup. Ensuring proper SSL settings, enabling reuseport, and advertising HTTP/3 support via the Alt-Svc header are crucial steps in making the transition successful. Additionally, maintaining HTTP/2 as a fallback ensures broad compatibility while taking advantage of the latest web technologies.
As more browsers and networks adopt HTTP/3, implementing it now will keep your web services ahead of the curve, offering better performance and reliability for your users.